Hello, fellow yarn enthusiasts! Are you ready to dive into a project that’s as serene and beautiful as its namesake? We’re absolutely thrilled to share our Water Lily Square, a delightful crochet pattern designed to bring a touch of nature’s elegance into your home.
Imagine a delicate crochet square, its textured petals unfurling like a blooming water lily, centered with a lovely, subtle bud. This design is perfect for everyone – from beginners looking for a rewarding first project to experienced crocheters wanting to add a unique motif to their repertoire. These squares are incredibly versatile; they make for stunning blankets, charming coasters, beautiful cushion covers, or even delicate appliqué accents for bags and garments.
In this article, we’ll guide you through creating your very own Water Lily Square with four distinct, free patterns. You’ll learn simple stitches and clever techniques to achieve that gorgeous floral effect, building your confidence and expanding your crochet skills with every stitch. Get your hooks ready – let the creative magic begin!
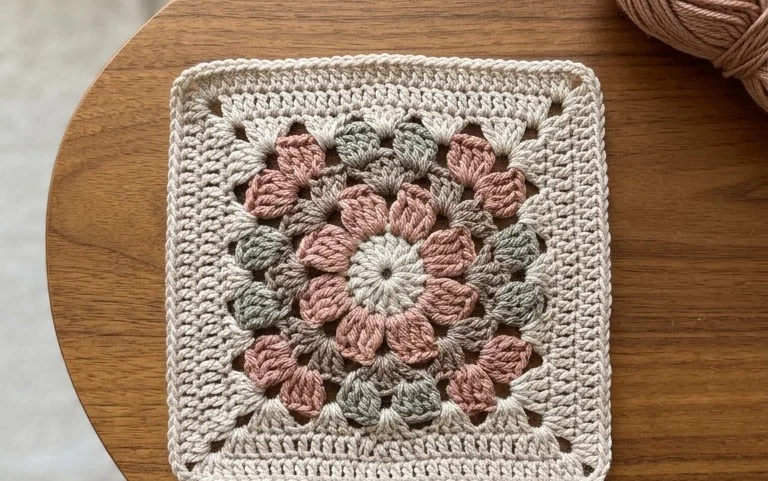
The Water Lily Square is a beautiful and versatile crochet motif that’s perfect for adding a touch of elegance to your makes. Its intricate petal design evokes the serene beauty of a water lily blooming on a tranquil pond, making it a popular choice for crafters looking to create something special. Whether you’re a seasoned crocheter seeking a new challenge or a beginner eager to expand your stitch repertoire, this pattern offers a rewarding and enjoyable experience. Let’s dive into everything you need to know to create your own stunning Water Lily Squares.
Understanding the Water Lily Square: A Crochet Journey
The charm of the Water Lily Square lies in its delicate, layered petals that radiate outwards from a central point. This design is achieved through a thoughtful combination of basic crochet stitches and some slightly more advanced techniques that, with a little practice, are easily mastered. The resulting motif is robust enough for blankets and garments, yet refined enough for decorative accents.
Essential Supplies: Yarn and Hook Recommendations
Choosing the right yarn and hook is crucial for bringing your Water Lily Square to life. The pattern is quite adaptable, but certain choices will enhance its beauty and drape.
* **Yarn:** For a classic and elegant look, **cotton yarns** are highly recommended. Cotton offers excellent stitch definition, a lovely drape, and is breathable, making it ideal for home décor items and garments. Look for worsted weight cotton for a good balance of drape and structure. However, acrylic yarns can also work beautifully, offering a wider range of colors and often being more budget-friendly and washable. For a softer, more luxurious feel, consider a cotton-blend yarn. The color palette you choose will significantly impact the final look. Think soft pastels for a gentle aesthetic, vibrant hues for a bolder statement, or classic white and green for a true water lily feel.
* **Hook:** The recommended hook size will usually be indicated in the specific pattern you are following, but generally, a **4.0mm (G/6 US) to 5.0mm (H/8 US) hook** is a good starting point for worsted weight yarn. Using a hook slightly larger than recommended can create a softer, more open fabric, while a smaller hook will result in a denser, more structured square. It’s always a good idea to crochet a small swatch with your chosen yarn and hook to check your gauge and ensure you achieve the desired fabric consistency.
Mastering the Stitches: Techniques You’ll Encounter
The Water Lily Square, while appearing complex, is built upon a foundation of fundamental crochet stitches. Familiarizing yourself with these will make the process smoother.
* **Magic Ring (or Adjustable Chain Loop):** This is often the starting point for creating a neat, tight center for your square without a visible hole. It allows you to crochet directly into the ring, creating a seamless beginning.
* **Single Crochet (sc):** A basic stitch that forms a dense, sturdy fabric. It’s used for building the foundation and some of the defining rows.
* **Half Double Crochet (hdc):** Taller than a single crochet, hdc creates a slightly looser fabric and adds height.
* **Double Crochet (dc):** A taller stitch that works up quickly and creates a more open fabric. This stitch is fundamental to forming the petal shapes.
* **Treble Crochet (tr):** Even taller than double crochet, trebles are often used to create elongated stitches or to add height and definition to the petal edges.
* **Slip Stitch (sl st):** Used for joining rounds, moving yarn without adding height, and creating clean edges.
* **Working in the Back Loop Only (BLO) or Front Loop Only (FLO):** Sometimes used to create texture or a slight ripple effect in certain rows, adding visual interest to the petals.
* **Working into Chain Spaces:** Instead of working directly into stitches, you’ll often work your stitches into the spaces created by previous chain stitches, which is key for forming the rounded petal shapes.
### Tips for Beginners: Navigating the Water Lily
Don’t let the intricate appearance of the Water Lily Square intimidate you! With a few beginner-friendly tips, you’ll be creating beautiful motifs in no time.
* **Start with a Solid Yarn:** For your first Water Lily Square, choose a light to medium-colored yarn that’s easy to see your stitches in. This will help you distinguish between stitches and loops, making it easier to learn the pattern.
* **Read Through the Pattern First:** Before you even pick up your hook, read the entire pattern from beginning to end. This will give you a good overview of the steps involved and help you anticipate what’s coming next.
* **Use a Stitch Marker:** Stitch markers are invaluable for marking the beginning of a round, the corners of the square, or any stitches that might be easily missed. This will prevent mistakes and save you from having to unravel your work.
* **Count Your Stitches:** This is perhaps the most important tip for any crochet pattern. At the end of each round, carefully count your stitches to ensure you have the correct number. This will prevent your square from becoming distorted or having uneven edges.
* **Don’t Be Afraid to Undo (Frog):** We all make mistakes! If you realize you’ve missed a stitch or made an error, don’t hesitate to “frog” (pull out) your work and fix it. It’s much easier to correct a mistake early on than to try and fix it later.
* **Watch Video Tutorials:** Many talented crocheters create video tutorials for popular patterns. Searching for “Water Lily Square crochet tutorial” on platforms like YouTube can provide a visual guide that complements written instructions. Seeing the stitches worked can be incredibly helpful.
* **Practice Each Stitch:** If you’re new to any of the stitches required, take some time to practice them individually on a separate swatch before diving into the Water Lily Square.
### Personalizing Your Creation: Customization Options
The beauty of crochet is its inherent customizability! The Water Lily Square is a fantastic canvas for your creative expression.
* **Color Play:**
* **Classic Water Lily:** Use white or cream for the petals and a light green for the base or border.
* **Sunset Bloom:** Alternate shades of pink, orange, and yellow for a vibrant, sunset-inspired effect.
* **Tropical Paradise:** Employ bold blues, greens, and even a pop of fuchsia.
* **Monochromatic Elegance:** Use different shades of the same color for a sophisticated look.
* **Solid Color:** A single, beautiful color can highlight the stitch pattern without distraction.
* **Size Variations:**
* **Smaller Motifs:** To create smaller squares, you might need to repeat fewer rounds or skip certain stitch increases. This is great for appliqué, coasters, or detailed embellishments.
* **Larger Motifs:** To make larger squares, you can simply repeat the pattern’s defining rounds or add additional rounds of single crochet or double crochet before starting the petal increases. This allows you to easily adapt the size for blankets, cushion covers, or even garment panels.
* **Border Enhancements:** The standard pattern will likely include a simple border, but you can elevate it further. Consider adding:
* A few rounds of shell stitches.
* A picot edge for a delicate finish.
* A contrasting color border to make the water lily pop.
* A solid dc or hdc border for a cleaner, more modern look.
### Caring for Your Finished Masterpiece
Once your Water Lily Square is complete, proper care will ensure its longevity and beauty.
* **Washing:**
* **Hand Wash:** This is generally the gentlest method for most crochet items. Use cool water and a mild detergent specifically designed for delicates or wool. Gently agitate the water and soak the item for about 15-30 minutes.
* **Machine Wash (with caution):** If your yarn label permits and you’re confident in the stitch integrity, you can machine wash your square on a delicate or hand-wash cycle in cool water. Always place your crochet item in a mesh laundry bag to prevent snagging and stretching.
* **Drying:**
* **Reshape and Lay Flat:** After washing, gently squeeze out excess water (do not wring!). Lay the square flat on a clean, dry towel and reshape it to its original dimensions. You may want to pin it to shape on a blocking mat or on a flat surface.
* **Avoid Hanging:** Never hang wet crochet items, as the weight of the water will stretch them out of shape.
* **Air Dry:** Allow your square to air dry completely. Avoid direct sunlight, which can fade colors, and avoid using a dryer, as the heat can damage the fibers and cause shrinkage.
* **Storage:** Store your finished Water Lily Squares flat in a breathable container or drawer. Avoid plastic bags, which can trap moisture. If storing for a long period, consider using cedar blocks or sachets to deter moths.
### Project Ideas: Beyond the Square
The Water Lily Square is incredibly versatile and can be used in a multitude of projects. Let your imagination bloom!
* **Coasters:** A perfect small project to practice the pattern and create a set of beautiful, functional coasters.
* **Dishcloths/Washcloths:** Cotton yarn is ideal for this, creating absorbent and durable kitchen or bath essentials.
* **Afghan/Blanket:** Join multiple Water Lily Squares together to create a stunning and cozy blanket. You can arrange them in a grid, alternate colors, or even create a mosaic effect.
* **Cushion Covers:** A single large square or a series of smaller squares can be assembled into unique and stylish cushion covers.
* **Garment Panels:** Imagine incorporating Water Lily Squares into the yoke of a sweater, as sleeves, or as decorative panels on a skirt or dress.
* **Tote Bag:** Create a sturdy tote bag by crocheting two large squares and joining them, adding handles.
* **Wall Hanging/Mandala:** Frame a single, beautifully colored Water Lily Square as a piece of art for your wall.
* **Appliqués:** Smaller versions of the Water Lily Square can be sewn onto other crochet or fabric items for unique embellishments.
The Water Lily Square is more than just a crochet pattern; it’s an opportunity to create something truly beautiful and personal. With a little patience, practice, and a touch of creativity, you can bring these delicate blooms to life in a way that’s uniquely yours. Happy crocheting!
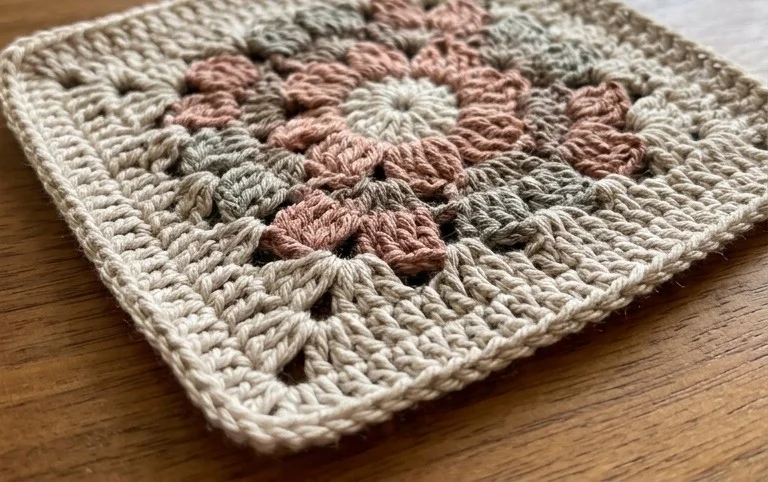
We hope you’ve enjoyed exploring these beautiful Water Lily Square crochet patterns! Whether you’re a seasoned crocheter or just starting out, these designs offer a delightful way to create something truly special. Don’t be afraid to dive in and give them a try – the process is as rewarding as the stunning results.
We can’t wait to see your gorgeous finished Water Lily Squares! Feel free to share your creations with us on social media using #WaterLilyCrochet – we love seeing your unique interpretations and color choices. Consider experimenting with different yarn weights or adding embellishments for a personal touch. And when you’re ready for your next crochet adventure, be sure to explore more of our free patterns!